Provide / Inject
This page assumes you've already read the Components Basics. Read that first if you are new to components.
Prop Drilling
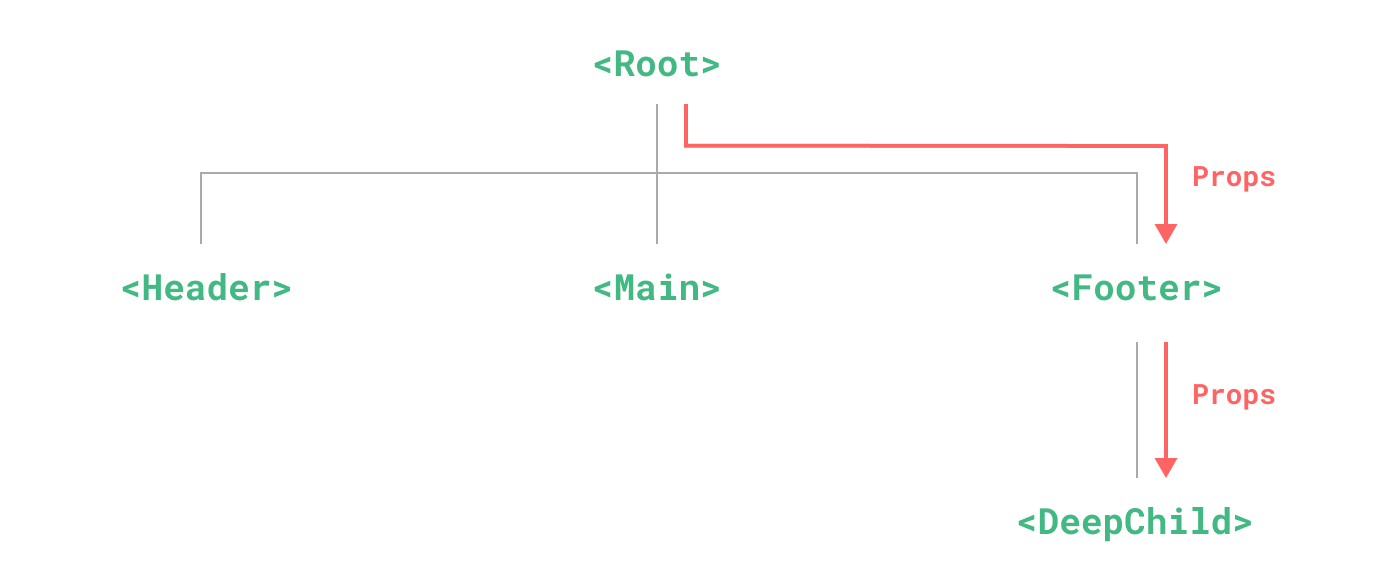
Usually, when we need to pass data from the parent to a child component, we use props. However, imagine the case where we have a large component tree, and a deeply nested component needs something from a distant ancestor component. With only props, we would have to pass the same prop across the entire parent chain:

Notice although the <Footer> component may not care about these props at all, it still needs to declare and pass them along just so <DeepChild> can access them. If there is a longer parent chain, more components would be affected along the way. This is called "props drilling" and definitely isn't fun to deal with.
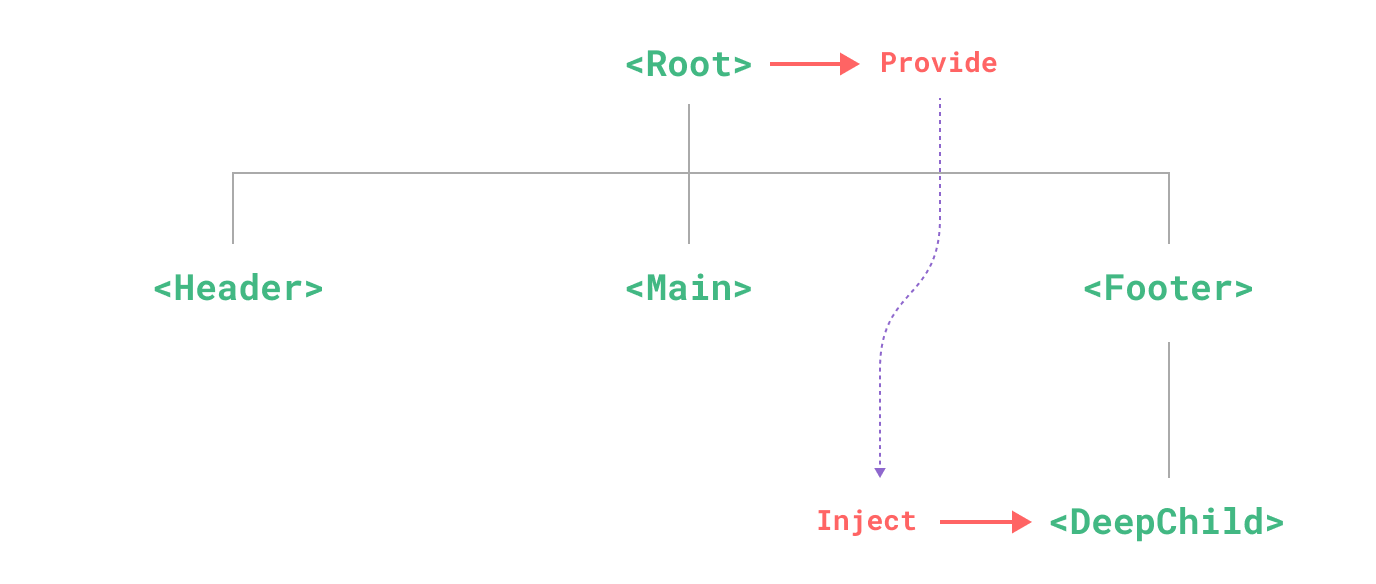
We can solve props drilling with provide and inject. A parent component can serve as a dependency provider for all its descendants. Any component in the descendant tree, regardless of how deep it is, can inject dependencies provided by components up in its parent chain.

Provide
To provide data to a component's descendants, use the provide() function:
<script setup>
import { provide } from 'vue'

provide(/* key */ 'message', /* value */ 'hello!')
</script>
If not using <script setup>, make sure provide() is called synchronously inside setup():
import { provide } from 'vue'

export default {
  setup() {
    provide(/* key */ 'message', /* value */ 'hello!')
  }
}
The provide() function accepts two arguments. The first argument is called the injection key, which can be a string or a Symbol. The injection key is used by descendant components to lookup the desired value to inject. A single component can call provide() multiple times with different injection keys to provide different values.
The second argument is the provided value. The value can be of any type, including reactive state such as refs:
import { ref, provide } from 'vue'

const count = ref(0)
provide('key', count)
Providing reactive values allows the descendant components using the provided value to establish a reactive connection to the provider component.
App-level Provide
In addition to providing data in a component, we can also provide at the app level:
import { createApp } from 'vue'

const app = createApp({})

app.provide(/* key */ 'message', /* value */ 'hello!')
App-level provides are available to all components rendered in the app. This is especially useful when writing plugins, as plugins typically wouldn't be able to provide values using components.
Inject
To inject data provided by an ancestor component, use the inject() function:
<script setup>
import { inject } from 'vue'

const message = inject('message')
</script>
If the provided value is a ref, it will be injected as-is and will not be automatically unwrapped. This allows the injector component to retain the reactivity connection to the provider component.
Full provide + inject Example with Reactivity
Again, if not using <script setup>, inject() should only be called synchronously inside setup():
import { inject } from 'vue'

export default {
  setup() {
    const message = inject('message')
    return { message }
  }
}
Injection Default Values
By default, inject assumes that the injected key is provided somewhere in the parent chain. In the case where the key is not provided, there will be a runtime warning.
If we want to make an injected property work with optional providers, we need to declare a default value, similar to props:
// `value` will be "default value"
// if no data matching "message" was provided
const value = inject('message', 'default value')
In some cases, the default value may need to be created by calling a function or instantiating a new class. To avoid unnecessary computation or side effects in case the optional value is not used, we can use a factory function for creating the default value:
const value = inject('key', () => new ExpensiveClass())
Working with Reactivity
When using reactive provide / inject values, it is recommended to keep any mutations to reactive state inside of the provider whenever possible. This ensures that the provided state and its possible mutations are co-located in the same component, making it easier to maintain in the future.
There may be times when we need to update the data from an injector component. In such cases, we recommend providing a function that is responsible for mutating the state:
<!-- inside provider component -->
<script setup>
import { provide, ref } from 'vue'

const location = ref('North Pole')

function updateLocation() {
  location.value = 'South Pole'
}

provide('location', {
  location,
  updateLocation
})
</script>
<!-- in injector component -->
<script setup>
import { inject } from 'vue'

const { location, updateLocation } = inject('location')
</script>

<template>
  <button @click="updateLocation">{{ location }}</button>
</template>
Finally, you can wrap the provided value with readonly() if you want to ensure that the data passed through provide cannot be mutated by the injected component.
<script setup>
import { ref, provide, readonly } from 'vue'

const count = ref(0)
provide('read-only-count', readonly(count))
</script>
Working with Symbol Keys
So far, we have been using string injection keys in the examples. If you are working in a large application with many dependency providers, or you are authoring components that are going to be used by other developers, it is best to use Symbol injection keys to avoid potential collisions.
It's recommended to export the Symbols in a dedicated file:
// keys.js
export const myInjectionKey = Symbol()
// in provider component
import { provide } from 'vue'
import { myInjectionKey } from './keys.js'

provide(myInjectionKey, {
  /* data to provide */
})
// in injector component
import { inject } from 'vue'
import { myInjectionKey } from './keys.js'

const injected = inject(myInjectionKey)
See also: Typing Provide / Inject